Creating Highlight Videos Worthy Of SportsCenter
From the official Adobe Premiere Elements 2.0 Boards
This is for Steve over on the official Elements 2.0 boards. Here's the latest demonstration video showing what you can achieve when you combine the power of Premiere Elements 2.0 with the power of Photoshop Elements 4.0.
It's a nice way to use Photoshop Elements 4.0 to really make highlight videos POP by exporting the frame you want to use from Premiere Elements 2.0 into Photoshop, using the lasso tool to isolate your image, using layers to seperate it and then using all the cool filters to make it really jump out before bringing it back into Premiere.
Best of all, it's a relative easy process to follow and the results can be very nice.
For my short clip, I first used Premiere Elements 2.0 to find the most likely frame to pull out. To make your life easy try to find a frame that has your subject clearly defined in it. This makes the process of pulling him or her out of it much easier than if you have to clean up alot of the image. Once you find that frame, you're going to export it as a still frame for editing in Photoshop. Make sure you set the preferences to deinterlace because it makes a significant difference in the image quality once you're in Photoshop.
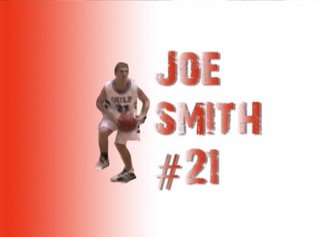
FINAL COMPOSITE SHOWING PHOTOSHOPPED PLAYER IMAGE
WITH PREMIERE TITLE EFFECTS
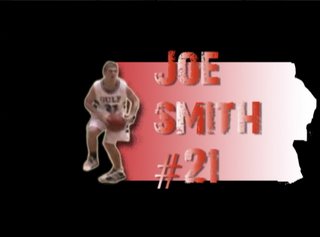
(VERSION ONE above; VERSION TWO below)
Once you get that image into Photoshop, it's just a matter of using the magic lasso tool to outline it. Take the outlined image, COPY it, paste it into it's own layer and then go to town with whatever filters and effects you want to use on it. For this brief example I simply used a gradient effect as the background. You could definitely use a nice outline effect around your subject along with a drop shadow if you wanted to make it pop. I spent all of 5 minutes creating the cutout. With a little more time and effort you can really achieve a clean, ESPN looking image.
Plus, you'll be working with footage you shot so hopefully you'll have a myriad of options for finding a good frame unlike here where I just googled for the clip and made it work for this exercise. If you plan ahead, you can really do some outstanding stuff using this process.
Bringing it back into Premiere Elements 2.0, you need only place the image on the timeline at the point where the frame belongs. If you leave Elements open while you're working on the image then when you come back in the CTI is right where you need to split the footage for insertion.
I recommend trying to let several seconds elapse before using this as the effect feels much more dynamic that way. Once you insert your image, it then becomes a matter of using titles to inform your viewers about the player you're highlighting. This is one of those times when getting crazy with transitions is not only acceptable but highly recommended. I've also included two versions of the clip to show the different effect possibilities.
Just make sure you're consistent with them and you'll achieve the strongest result.
Cheers!
Sports Movies- How to highlight one individual
Steve Lovas - 02:25pm Jul 2, 2006 Pacific
Does anyone know how to do this in Premiere Elements? I'm trying to make a sports video of my son for college and would like to place an arrow or highlight him prior to a play commencing.
Many thanks
This is for Steve over on the official Elements 2.0 boards. Here's the latest demonstration video showing what you can achieve when you combine the power of Premiere Elements 2.0 with the power of Photoshop Elements 4.0.
It's a nice way to use Photoshop Elements 4.0 to really make highlight videos POP by exporting the frame you want to use from Premiere Elements 2.0 into Photoshop, using the lasso tool to isolate your image, using layers to seperate it and then using all the cool filters to make it really jump out before bringing it back into Premiere.
Best of all, it's a relative easy process to follow and the results can be very nice.
For my short clip, I first used Premiere Elements 2.0 to find the most likely frame to pull out. To make your life easy try to find a frame that has your subject clearly defined in it. This makes the process of pulling him or her out of it much easier than if you have to clean up alot of the image. Once you find that frame, you're going to export it as a still frame for editing in Photoshop. Make sure you set the preferences to deinterlace because it makes a significant difference in the image quality once you're in Photoshop.
FINAL COMPOSITE SHOWING PHOTOSHOPPED PLAYER IMAGE
WITH PREMIERE TITLE EFFECTS
(VERSION ONE above; VERSION TWO below)


Once you get that image into Photoshop, it's just a matter of using the magic lasso tool to outline it. Take the outlined image, COPY it, paste it into it's own layer and then go to town with whatever filters and effects you want to use on it. For this brief example I simply used a gradient effect as the background. You could definitely use a nice outline effect around your subject along with a drop shadow if you wanted to make it pop. I spent all of 5 minutes creating the cutout. With a little more time and effort you can really achieve a clean, ESPN looking image.
Plus, you'll be working with footage you shot so hopefully you'll have a myriad of options for finding a good frame unlike here where I just googled for the clip and made it work for this exercise. If you plan ahead, you can really do some outstanding stuff using this process.
Bringing it back into Premiere Elements 2.0, you need only place the image on the timeline at the point where the frame belongs. If you leave Elements open while you're working on the image then when you come back in the CTI is right where you need to split the footage for insertion.
I recommend trying to let several seconds elapse before using this as the effect feels much more dynamic that way. Once you insert your image, it then becomes a matter of using titles to inform your viewers about the player you're highlighting. This is one of those times when getting crazy with transitions is not only acceptable but highly recommended. I've also included two versions of the clip to show the different effect possibilities.
Just make sure you're consistent with them and you'll achieve the strongest result.
Cheers!
![[Valid RSS]](http://photos1.blogger.com/blogger/6551/554/1600/valid-rss.png "Validate my RSS feed")