24 Titles Step-by-Step: The Process For Creating Title Effects From The TV Show Using Photoshop Elements 4.0 and Premiere Elements 2.0
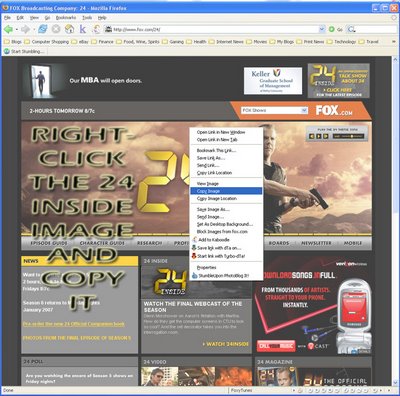
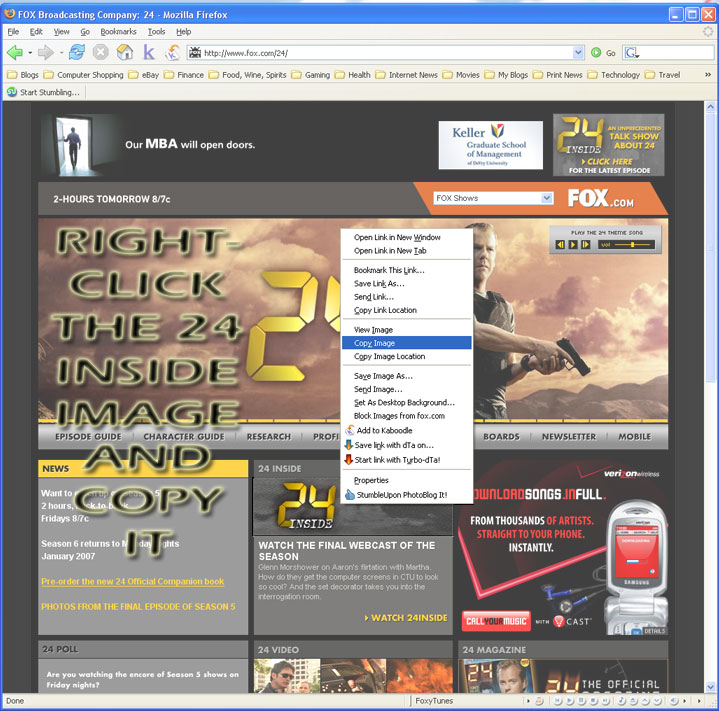
First, we need to get the color right. Head to http://www.fox.com/24 and copy the "24" logo.
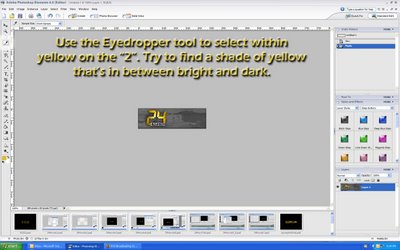
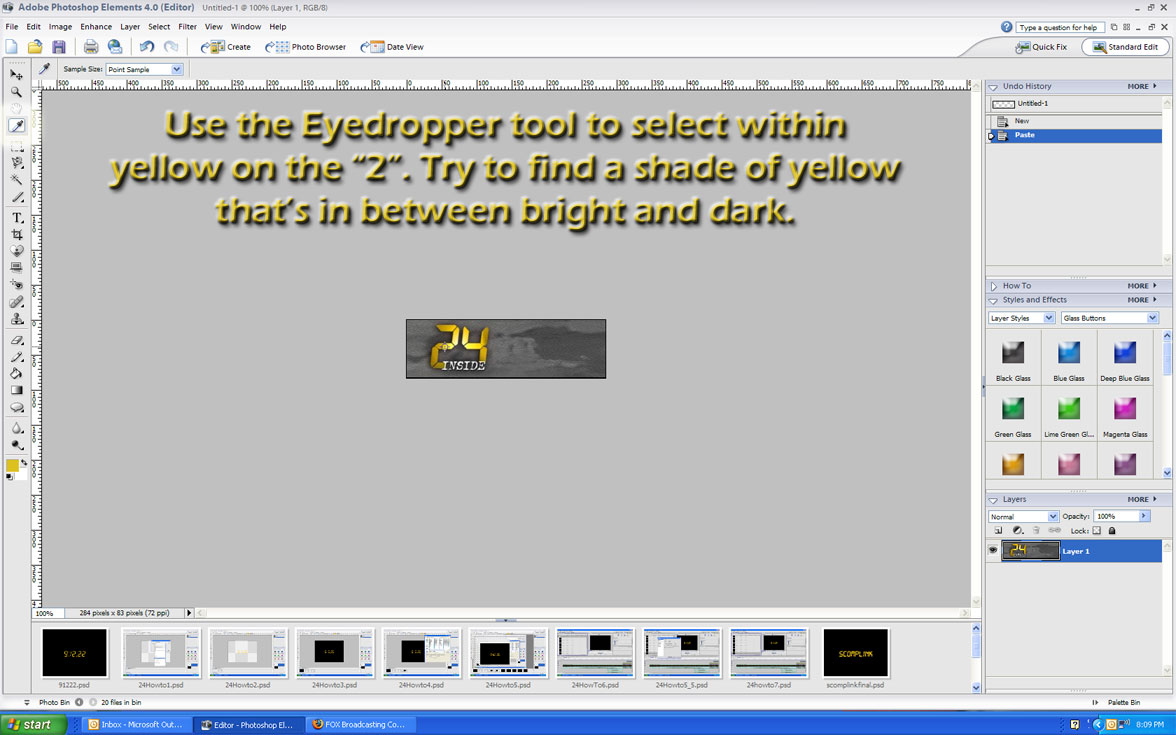
Next, we need to fire up Adobe Photoshop Elements (or your favorite image editor) to start creating "24" title effects. Open a new document, paste the "24" logo we just copied from the website onto the blank document.
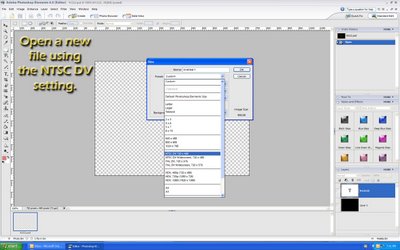
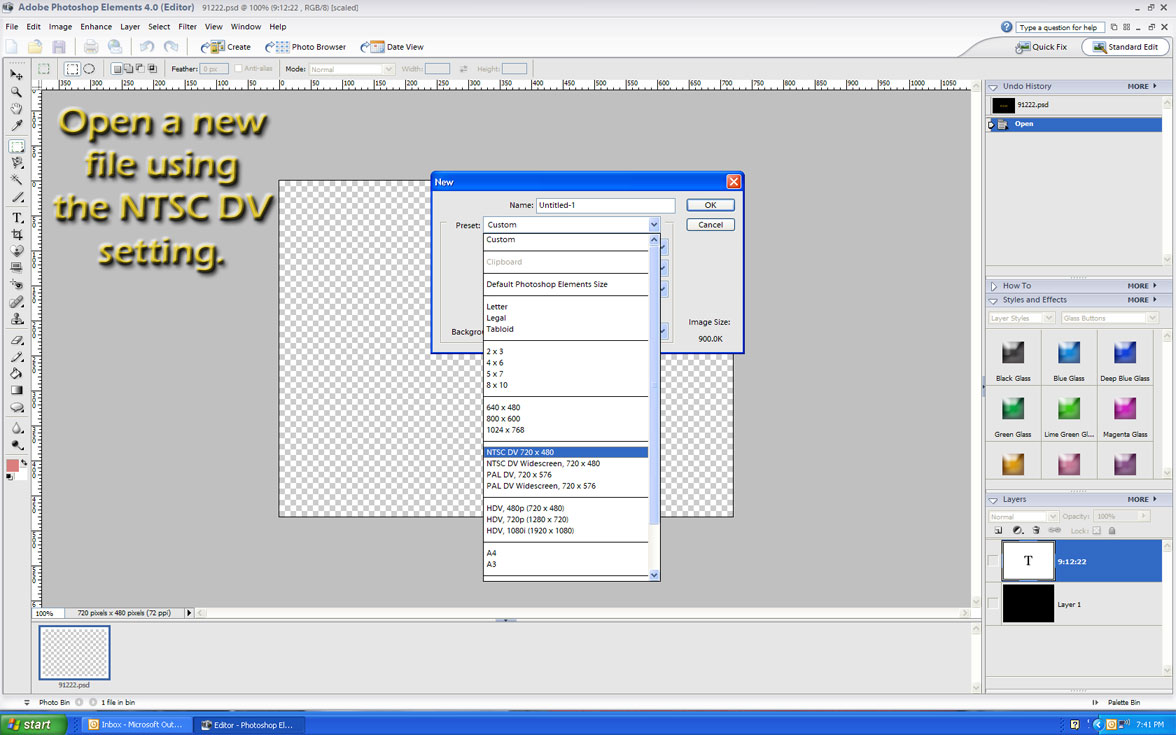
Now, open a new file using the NTSC DV settings as seen in the screenshot below.
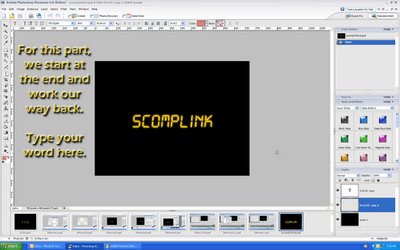
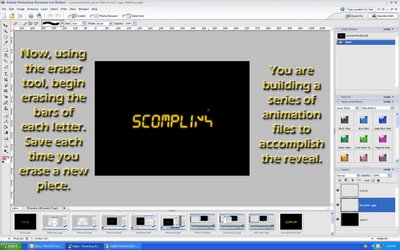
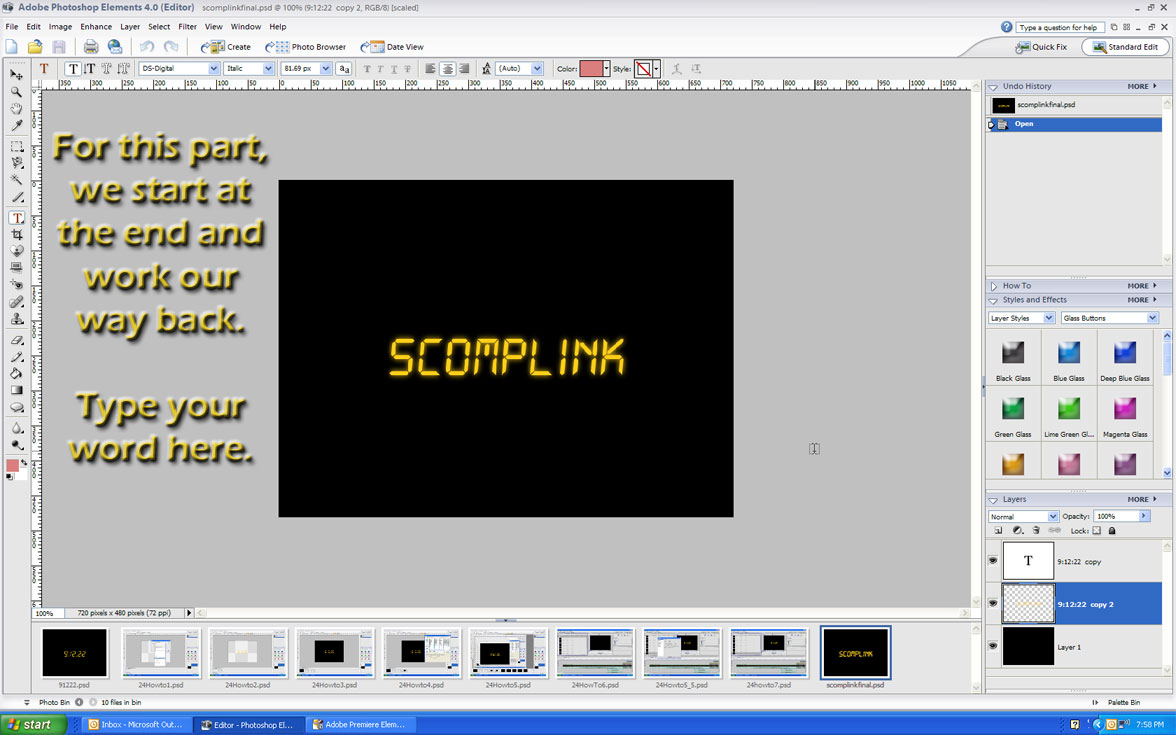
Since we're dealing with two different sets of title effects let's look at the opening logo reveal effect. For this, you are going to be working backward from how the effect actually plays out. In other words, since the effect starts on a black screen and ends with our logo, in Photoshop we start with the whole word and erase our way back to black. It's simply a stepping process for creating each frame with one or two fewer pieces of our digital clock logo. If you don't have a digital clock font you can get the font right here.
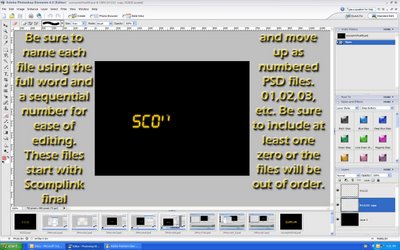
Be sure to save after each erasing session. You should try to have a simple naming structure to make the actual editing process in Premiere as easy as possible. For my project I called the first file SCOMPLINKFINAL (the fully revealed logo) and each subsequent file I simply added 01,02,03,04 all the way to SCOMPLINKFINAL17 (an empty black frame)
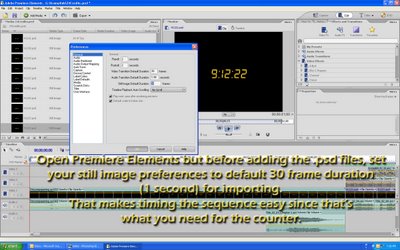
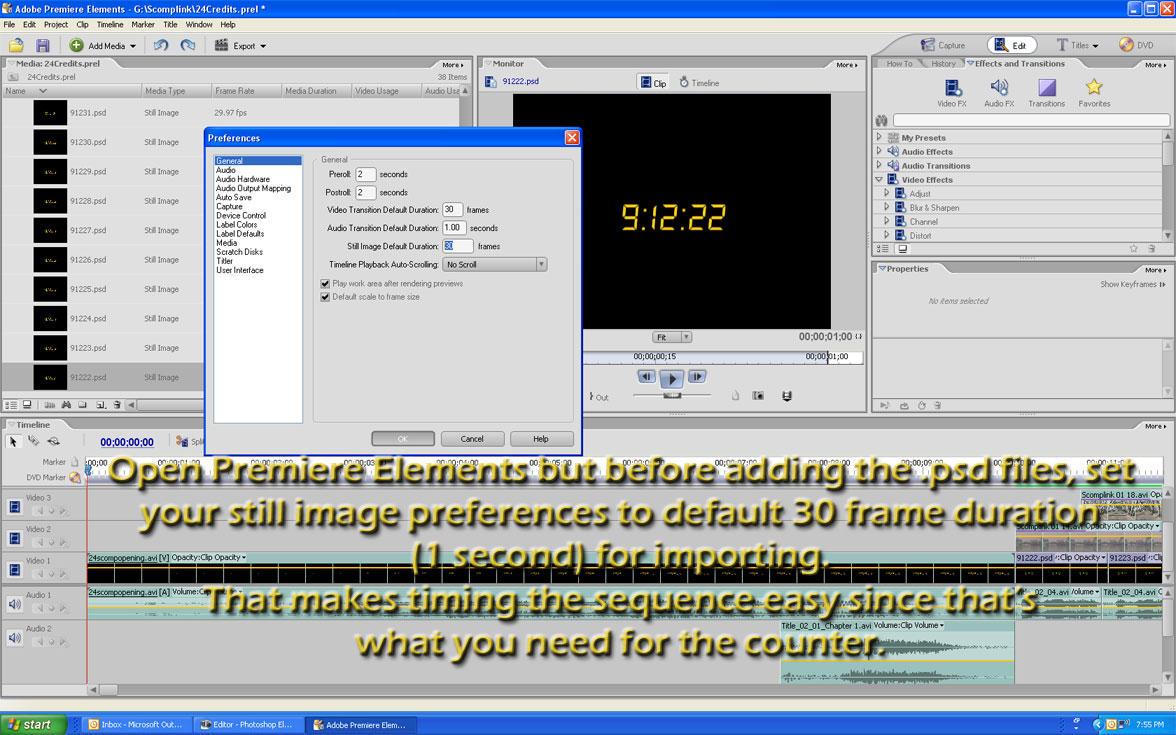
Open Adobe Premiere Elements 2.0. First setup the preferences for adding the .psd media files we just created by setting the still image frame duration to 30 (1 second of screen time). Next, CREATE TWO FOLDERS in your media bin for each set of title effects we're going to be adding. THIS IS IMPORTANT. DO NOT add the files into the media bin. If you do, they could be mixed up and you DO NOT want to have to keep clicking to find the right one.
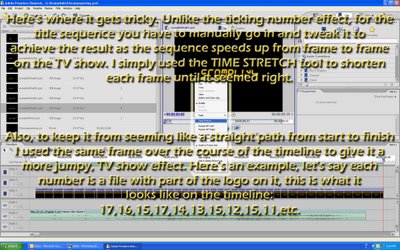
For the Opening Title Reveal Effect, you may want to go back into preferences and set it to a duration of 15 frames as you will be manually tinkering with each frame to achieve the desired result. If you watch the shows opening, each clock piece reveals out of sequence and the process speeds up from start to finish. All in about the span of 7 seconds. Hence, you are going to be tinkering repeatedly with TIME STRETCH on every frame if you want to achieve the right look. Plus, you need to drag the same frame back into the timeline several times to give the effect that random look.
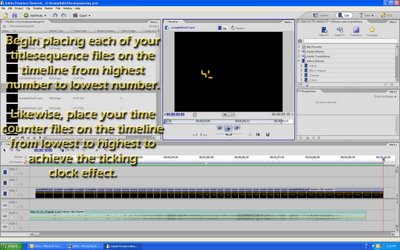
Once you get the Opening Title Reveal to look the way you want, you can then move onto the ticking clock effect which is a piece of cake in comparison. All your work is done for you by now since setting the preferences for still frame duration is all that you need to do. Well, that and making sure to put the correct frame on the timeline in the correct order.
Now, playback your newly created 24 Title Effects. It's pretty cool, but it's missing a major element. That's right.
Sound.
Unfortunately, there's no easy answer here for the sound effect since it's virtually impossible to find a good version of either sound online. Trust me, I tried. I ended up ripping the first five minutes of an episode using the DVD Ripper program I talked about in the prior blog to then import that 5 minute clip into the timeline, unlinked the video and audio, deleted the video from the timeline, moved the Logo reveal sound to the Logo and moved the ticking BOOM sound to the digital clock readout numbers. At that point it's just a matter of making the sound run the length you need it to run. The counting up clock syncs easily since the beats of that BOOM are at one second intervals. Just make copies of it as many times as your needs dictate.
For the Logo reveal sound effect, here's where you'll realize just how fast that thing gets. I gave up trying to sync the video to it but you can see the effect of sound and picture is still pretty effective.
And here is my final render with titles and sound.
Well, that just about wraps it up for this little Step-by-Step Guide. I hope you found it helpul. If you did, let me know. I'd love to get some feedback. :)
Next, we need to fire up Adobe Photoshop Elements (or your favorite image editor) to start creating "24" title effects. Open a new document, paste the "24" logo we just copied from the website onto the blank document.
Now, open a new file using the NTSC DV settings as seen in the screenshot below.
Since we're dealing with two different sets of title effects let's look at the opening logo reveal effect. For this, you are going to be working backward from how the effect actually plays out. In other words, since the effect starts on a black screen and ends with our logo, in Photoshop we start with the whole word and erase our way back to black. It's simply a stepping process for creating each frame with one or two fewer pieces of our digital clock logo. If you don't have a digital clock font you can get the font right here.
Be sure to save after each erasing session. You should try to have a simple naming structure to make the actual editing process in Premiere as easy as possible. For my project I called the first file SCOMPLINKFINAL (the fully revealed logo) and each subsequent file I simply added 01,02,03,04 all the way to SCOMPLINKFINAL17 (an empty black frame)


Open Adobe Premiere Elements 2.0. First setup the preferences for adding the .psd media files we just created by setting the still image frame duration to 30 (1 second of screen time). Next, CREATE TWO FOLDERS in your media bin for each set of title effects we're going to be adding. THIS IS IMPORTANT. DO NOT add the files into the media bin. If you do, they could be mixed up and you DO NOT want to have to keep clicking to find the right one.

For the Opening Title Reveal Effect, you may want to go back into preferences and set it to a duration of 15 frames as you will be manually tinkering with each frame to achieve the desired result. If you watch the shows opening, each clock piece reveals out of sequence and the process speeds up from start to finish. All in about the span of 7 seconds. Hence, you are going to be tinkering repeatedly with TIME STRETCH on every frame if you want to achieve the right look. Plus, you need to drag the same frame back into the timeline several times to give the effect that random look.

Once you get the Opening Title Reveal to look the way you want, you can then move onto the ticking clock effect which is a piece of cake in comparison. All your work is done for you by now since setting the preferences for still frame duration is all that you need to do. Well, that and making sure to put the correct frame on the timeline in the correct order.
Now, playback your newly created 24 Title Effects. It's pretty cool, but it's missing a major element. That's right.
Sound.
Unfortunately, there's no easy answer here for the sound effect since it's virtually impossible to find a good version of either sound online. Trust me, I tried. I ended up ripping the first five minutes of an episode using the DVD Ripper program I talked about in the prior blog to then import that 5 minute clip into the timeline, unlinked the video and audio, deleted the video from the timeline, moved the Logo reveal sound to the Logo and moved the ticking BOOM sound to the digital clock readout numbers. At that point it's just a matter of making the sound run the length you need it to run. The counting up clock syncs easily since the beats of that BOOM are at one second intervals. Just make copies of it as many times as your needs dictate.
For the Logo reveal sound effect, here's where you'll realize just how fast that thing gets. I gave up trying to sync the video to it but you can see the effect of sound and picture is still pretty effective.
And here is my final render with titles and sound.
Well, that just about wraps it up for this little Step-by-Step Guide. I hope you found it helpul. If you did, let me know. I'd love to get some feedback. :)
![[Valid RSS]](http://photos1.blogger.com/blogger/6551/554/1600/valid-rss.png "Validate my RSS feed")