Thursday, July 27, 2006

Putting It All Together: Flying the Sony A1U on the Steadicam Merlin

Now that all my equipment is here, I'm in the process of putting it all together. The first step to this is spending the next 3 weeks really learning how to fly the Steadicam Merlin and the Sony A1U. For this first video, what you'll see is essentially my first flight with the basic setup of nothing but the camera on the Merlin. The only additional piece of equipment on the camera included the larger camera battery which required that the doveplate be moved forward to compensate for the heavier backend. The footage was shot inside a home with no additional camera lighting and shows that the A1U captures adequate lowlight footage but definitely needs more light. I would never attempt to use this kind of footage in a professional project as it doesn't hold up in the darker areas from a purely technical viewpoint ignoring the newbie Merlin mistakes.

The Steadicam Merlin is not a tool for people with limited patience as it requires a great deal of tweaking to maintain good balance. If you watch closely, you'll notice some subtle (and not so subtle) pendulum swings in the footage. For the first flight, I'm pretty happy with the overall look of the footage. I'll continue to add more Merlin footage over the coming days and weeks to document my progress with it and to show what both it and the A1U can do in better lighting conditions.


For most Merlin work, the camera will be flying with both the XLR mount and either a Sennheiser G2 100 wireless receiver for a wireless Boom or the Rode NTG-2 shotgun mounted in a shockmount on the camera so as I get each setup balanced I'll include a post listing my settings as well.

Monday, July 17, 2006

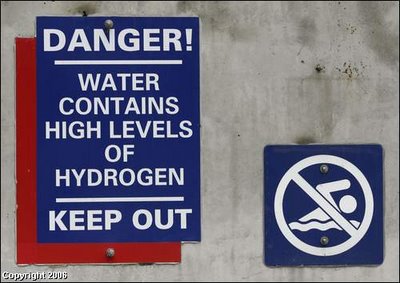
OFF TOPIC: And People Wonder Why Kentucky Gets a Bad Rap For Its' Education System?


I'd say something witty here but I'm stumped to come up with anything funnier than that sign.

The signs at the cascading pools in Waterfront Park are meant to frighten: They proclaim in bold letters, "danger" and "high levels of hydrogen."

But the warnings are bogus.

The water in the fountain pools is, like all water, made of two-thirds hydrogen atoms and one-third oxygen atoms.

And as any chemistry student can tell you, there is no health threat from coming into contact with H20.

David Karem, the Waterfront Development Corp.'s executive director, had the signs made to try to keep people out of the water after health officials raised concerns about bacteria in the fountains last year.

However, tests this year show the fountains meeting swimming pool standards.


Karem acknowledged that he might be fighting a losing battle. "I could go out there with stun guns," he said, and it would do no good.

Now that's really funny.

Thursday, July 13, 2006

Behind the scenes of Reno Digital: Preparing for the Big Day

I just wanted to take a minute to let everyone know that I am currently in the process of creating a video production company and as such, that's why site updates are kinda slowed this week. Starting a company can eat up so much of your time but I didn't want to neglect this site so I wanted to drop in and say that over the next several weeks I'll be continuing to create cool new content for Reno Digital along with some other stuff. Plus once things settle down, I have much bigger plans that I hope will really stir the creative juices of everyone interested in this whole video editing passion we all share.

I'm also going to be documenting the creation and setup of my new company because all of it ties directly into my vision for what I want to do on the web. Early next week, be on the lookout for part one of this behind the scenes look at what goes into creating a video production company. I'll go over the details of selecting equipment and software and how I arrived at the decisions I've made. This series will probably be on going for the next several months as I struggle much like every other new business owner does in all the little details and I wanted to document every exciting and scary step along the way.

Till next week, take care and keep on editing.

Cheers
Greg

Friday, July 07, 2006

Welcome To The Readers of 'Making Movies'

Howdy! Just wanted to take a moment to welcome all the readers of Jim Thompson's great little slice of the blogosphere, Making Movies.

For everyone else who might not know, Jim runs an "officially" sanctioned blog as part of the Houston Chronicle newspaper's team of newly revamped bloggers. Jim's part of that team, and I must say, the first NASA employee (that I'm aware of) to swing on by my slice of the blogosphere, webosphere, whateverkindofsphere, leave a comment and I think I know why.

Jim has some quality concerns with YouTube and we both agree that neither of the big sites is going to win an award for high quality looking video streams.

Here's a quick peek at Jim's shootout of Google Video and YouTube Video.
If you've been reading this blog for long, you know I have a problem with the quality of YouTube's transcoded videos. YouTube uses an older version of the FLV video codec, and transcodes its videos to too low a bitrate. I discovered this when I uploaded my one-minute video to YouTube. It turns out that this particular video is a kind of torture test for video compression, because of all its scene detail and motion. So I'm going to trot it out one more time.

Now in fairness to Jim, and also because the man is a NASA software engineer, I can't argue that it appears the Google Video clip video quality looks better. How can I begin to compete with a NASA guy? I got my degree in Journalism from a school in Kentucky. Jim, well he only helps WRITE CODE for our SPACE SHUTTLE Program. He's got the freakin' ultimate trump card.
Me: Google Video Sucks.

Jim: Oh yeah? Well, I just helped launch the Space Shuttle.

Me: Hmm, would ya look at the time? I gotta go paint the kitchen.
But in all seriousness, anytime like minds get together cool things happen and I'm glad Jim is passionate enough about this endeavor that out of what must be a busy workload he takes the time to talk about his love for making movies in such an open forum both on his site and over here.

So to Jim and all you fine Texas folks, welcome to Reno Digital. Make yourselves at home. Stay a while. We've got lots of cool stuff coming, and if you're interested in movie making and video editing then you've come to the right place whether its over on Making Movies or right here. Plus, take a look at the sidebar links and see if there aren't a few sites you might not have visited. We'll probably bump into each other elsewhere. If we do, don't be afraid to say hi.

Ain't the internet cool?

Fun With YouTube: This Site Is Not THX Certified

Just on a lark I stripped the THX opening titles from a movie, made a few *ahem* adjustments, and sent the file to out into that wonderful land called YouTube.

While waiting for it to finish uploading a thought occured to me. I wonder if modifying the resolution settings would create a properly scaled video that I might be able to fit on the top of the sidebar.

And ya know what?

It worked.

But for those of you wearing bifocals here's the normal rez version of it. For everyone else, I think I'll leave it there. Now I just need to come up with one new sidebar video for each page.

Good times.


This Site Is Not THX Certified

Wednesday, July 05, 2006

The Google Video and YouTube Video Shootout

As more and more of the free video hosting services spring up I thought I'd take a moment to compare the relative quality of the two largest providers of the service for ease of use, available options and image quality. First up, Google Video. Signing up for both services requires the same information and both signups work as intended.

The process for uploading video to Google is essentially the same as uploading video to YouTube with one significant difference. The Google Video Uploader application allows you to cue multiple videos and runs as a simple standalone application so you don't have to be logged in via your browser to manage your videos or upload them. You'll simply enter your Google account information and password and the application does the rest.

Google Video Uploader Interface


UPLOAD INTERFACE: Google: 1 YouTube: 0

As far as speed, neither seems especially fast although in unscientific testing I believe that YouTube is marginally faster by about 10%. But there are far too many variables to make any definitive statement regarding who's service is the fastest.

UPLOAD SPEEDS: Google: 1 YouTube: 1

You can find the rest of the shootout here.

Tuesday, July 04, 2006

WEDNESDAY FEATURE

RECORD-EDIT-PREMIERE WEEKLY CHALLENGE
Since this site is about our community, it's time to start showing your latest masterpiece to the world and letting them decide just how masterful it really is. Record-Edit-Premiere, or REP for short, is all about taking chances, sharing your creative vision and letting the community vote on what they enjoy for each week's entries. Here's how it works: every Wednesday I'll post the REP CHALLENGE and any rules that might be in play. Each REP CHALLENGE will be a different theme. This week, for its debut, I'm posting it on Tuesday because today also happens to be a national holiday for the USA and a great day to shoot some video.

REP CHALLENGE FOR WEEK ONE
: The Fourth of July

REP CHALLENGE REQUIREMENTS: Your video submission must be over 2 minutes long but no longer than 5 minutes long. What you shoot is up to you, but it must somehow include the theme for this week. You can create a slideshow if you so desire using still images and audio. Your video should be appropriate for all ages and at no time should you endanger yourself (like our Darwin Awards Candidate in the clip below) or anyone else during your video. To submit your video, post it to youtube, and send the link to REP CHALLENGE ENTRY. Please include your first name and last initial for voting purposes, a brief summary of your entry including running time and the tools you used to create your entry (Photoshop for graphics, filters, transitions, effects, etc.).

No more than six entries will be accepted for each REP CHALLENGE so don't wait to submit your entry. The deadline for submission is midnight on the following Tuesday of each REP CHALLENGE. I'll post all the entries the following Wednesday along with the next REP CHALLENGE.

Along with posting the entries, there will also be a poll for voting on your favorite entry. The poll will run until midnight on the following Tuesday. In the event of a tie, I will cast the deciding vote. The winner will be annonced as part of the REP CHALLENGE and the video will be put in the HALL OF FAME for all to enjoy.

So, you think you're the next Spielberg, Scorcese or Altman? Well, it's time to find out just how good you are and this week you'd better have some serious fireworks to make that happen. Oh, and if you happen to have fun and learn something new along the way, well, that's what the REP CHALLENGE is all about in the first place.
Monday, July 03, 2006

For Everyone In The Good Old US of A Be Safe This Holiday

Look, I like beer and explosives as much as the next red-blooded American man does, but it doesn't mean when your best friend Jerry says he wants you to hold a tube of questionably manufactured Chinese explosives you think that would be a great way to spend your night when, in point of fact, chances are better than 50/50 someone ends up screaming in agony while a certain part of someone's hand is suddenly a brilliantly colored fireball.


So, I'm asking you to consider very carefully your answer before you agree to Jerry's request. After all, it's kinda hard to scrub through your niece's birthday party video with a stub and one good eye.

For everyone outside the USA, have a great Tuesday.

Be safe this Fourth of July

Greg

The New Poll Is Now Available For Your Voting Pleasure

If you haven't voted yet, now's your chance to add your two cents to yet another internet poll. Only this time, your votes actually count for something other than who has has the best computer game or which movie is most likely to suck.

Here, you get to vote on what you'd like to see for new demonstrations, and tutorials. All for one low price.

Well, ok. It's free. But you gotta spend the time reading each poll response so that counts for something, right?

This week's polls asks the searing question:
What kind of Premiere 2.0 How-To video would you most like to see?

What are you waiting for? Go click. You'll be glad you did.

Sunday, July 02, 2006

Fun With Keyframes: Making Homer Play Basketball

Stuart Klein - 7:13pm Jul 2, 06 PST (#1 of 1)

Greg,

Can you do the same thing for me to illustrate use of keyframes to replace a face in a video that is moving around with a face from a still photo without putting keyframe points in every frame of the video as suggested in response to my question on the form (see "Replace face in video with face in still photo" (1 message; 6/29/06). If you can, I would appreciate it very much.

Thanks,
Stu Klein

Here ya go, Stu. This is the same type of effect you'll see in use on America's Funniest Home Video's when they take host Tom Bergeron's head and put it into some of the submitted videos. It's a surprisingly funny effect even here on an 11 second clip with Homer Simpson.

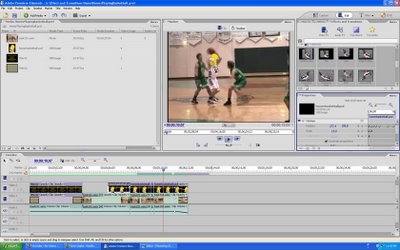
For this excercise, I found a picture of Homer Simpson online, copied it into Photoshop, cleaned it up and then added it to the project media bin. From there, it was just a matter of placing the head onto the first frame where I wanted it to show up. Then, opening the properties panel and activating the toggle animation button to record my keyframes I began the process for making Homer play basketball in my short clip. Just scale the head to make it more in line with your other subjects and you don't really have to do it frame by frame since you can adjust his head as the frames change.


It's a matter of tweaking it because the players head moves alot, you'll move Homer as well and the keyframes are automatically added. You can flip the head using the horizontal flip option under the Video Effects menu to keep it facing the right direction and as the video goes along, you can keep adding flips as necessary and the timeline reflects the flip rather than having to break the clip up into sections. All your tweaks can be recorded on the same piece of video.

SCREENSHOT FROM HOMER KEYFRAMING PROJECT


You certainly don't have to keyframe every single frame of the video but the more you do the better your end result can be. It can be as accurate or as loose as you want it to be. For this, I didn't spend much time at all doing it and it turned out ok.

I think it's funny just because Homer makes me laugh anyway and I'm not above going for the cheap laughs. I also went back in and did it with TIME STRETCH of 50% for a nice slow motion effect.

Cheers!

Creating Highlight Videos Worthy Of SportsCenter

From the official Adobe Premiere Elements 2.0 Boards
Sports Movies- How to highlight one individual

Steve Lovas - 02:25pm Jul 2, 2006 Pacific

Does anyone know how to do this in Premiere Elements? I'm trying to make a sports video of my son for college and would like to place an arrow or highlight him prior to a play commencing.

Many thanks

This is for Steve over on the official Elements 2.0 boards. Here's the latest demonstration video showing what you can achieve when you combine the power of Premiere Elements 2.0 with the power of Photoshop Elements 4.0.


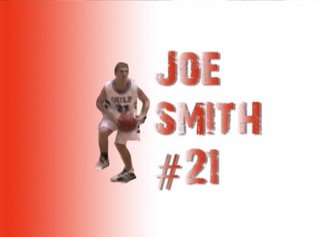
It's a nice way to use Photoshop Elements 4.0 to really make highlight videos POP by exporting the frame you want to use from Premiere Elements 2.0 into Photoshop, using the lasso tool to isolate your image, using layers to seperate it and then using all the cool filters to make it really jump out before bringing it back into Premiere.

Best of all, it's a relative easy process to follow and the results can be very nice.

For my short clip, I first used Premiere Elements 2.0 to find the most likely frame to pull out. To make your life easy try to find a frame that has your subject clearly defined in it. This makes the process of pulling him or her out of it much easier than if you have to clean up alot of the image. Once you find that frame, you're going to export it as a still frame for editing in Photoshop. Make sure you set the preferences to deinterlace because it makes a significant difference in the image quality once you're in Photoshop.

FINAL COMPOSITE SHOWING PHOTOSHOPPED PLAYER IMAGE
WITH PREMIERE TITLE EFFECTS
(VERSION ONE above; VERSION TWO below)


Once you get that image into Photoshop, it's just a matter of using the magic lasso tool to outline it. Take the outlined image, COPY it, paste it into it's own layer and then go to town with whatever filters and effects you want to use on it. For this brief example I simply used a gradient effect as the background. You could definitely use a nice outline effect around your subject along with a drop shadow if you wanted to make it pop. I spent all of 5 minutes creating the cutout. With a little more time and effort you can really achieve a clean, ESPN looking image.

Plus, you'll be working with footage you shot so hopefully you'll have a myriad of options for finding a good frame unlike here where I just googled for the clip and made it work for this exercise. If you plan ahead, you can really do some outstanding stuff using this process.

Bringing it back into Premiere Elements 2.0, you need only place the image on the timeline at the point where the frame belongs. If you leave Elements open while you're working on the image then when you come back in the CTI is right where you need to split the footage for insertion.

I recommend trying to let several seconds elapse before using this as the effect feels much more dynamic that way. Once you insert your image, it then becomes a matter of using titles to inform your viewers about the player you're highlighting. This is one of those times when getting crazy with transitions is not only acceptable but highly recommended. I've also included two versions of the clip to show the different effect possibilities.

Just make sure you're consistent with them and you'll achieve the strongest result.

Cheers!

Transitions Compilation Now Available, No Really, This Time I Mean It...

Just completed the Video Transitions compilation. It is now posted and ready for consumption. I will say that I found several really nice effects that I never would have found otherwise. Good stuff.


A couple of quick points. First, the Keying Transitions are not represented in this compilation as I didn't have any keyed material to use but luckily there are only 4 not seen here. Second, I swear the 3D Motion - Spin transition looks nothing like any spin I've ever seen. I checked it twice to make sure I didn't miss something. Lastly, I really think after using cross dissolves as my go-to choice 9 out of 10 times I like how most of the Slides work and I'm gonna try to use them more.

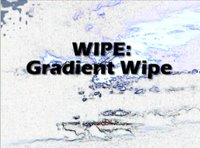
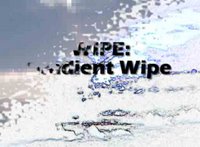
Favorite transition that I'd never considered let alone even seen: Wipe: Gradient Wipe and you'll find it at the 5:07 mark in the Transitions video.

It's just cool. And looking at the screen caps I realize that it reminds me of a blowing snow kind of effect.

I also think the key to a good edit is to maintain consistency and transitions are a big part of that. You can always tell someone new to editing because they pepper the video with 27 different transitions in a 3 minute clip. :)

Saturday, July 01, 2006

Premiere Elements 2.0 Tip O'The Day: The Workbar Shortcuts

This tip was posted over on the official boards but it's too good to let hide over there.

You can set the workbar position wherever you need it to be by moving the CTI to the in point(the starting point for your needs), press ALT-[ now drag the CTI to where you want the out point (the ending point for your needs) and press ALT-]. Now the workbar should be right where you need it most. This sure beats playing hide and seek looking for the end point of the work bar on long projects. Plus, don't forget that by double clicking anywhere on the workbar area it automatically extends the full length of your progect.

Special thanks go out to Ken Jarstad for dropping this in our lap. Nicely done!

Tired of trying to figure out what all the Video Effects look like in Premiere Elements 2.0?

Well, so am I so I did something about it. Oh sure, there are still images of each effect but does that make sense for a program about VIDEO editing?

I took two clips of video (sunsets), made each clip 5 seconds long and proceeded to take each and EVERY Video Effect and apply it to one of the clips. In order to make sense out of it all, each effect is labeled clearly for Category and Style.


What I learned is that the vast majority of effects require some type of keyframing to really make the effect pop. In some instances, without setting keyframes the applied effect makes little to no noticeable impact on the clip.

The keying clips all relate to matting out some element in your video and as such the blue/green screen mattes don't really translate for this exercise so just understand that you'd need some footage shot in front of a blue/green screen to use either of these effects.

The Tracking Matte effect is the effect used most often for blurring out someones face, or license plate in videos. It can also be used to make titles show video within the title.

In most instances, I used the default effect properties settings. You'll know where I didn't because the effect either keyframes, moves or is skewed in some way to demonstrate the effect.

With all the effects, titles, cross dissolve transitions and music the final render output is 320x240 at 1.5mbps and took just over five minutes to render for the youtube version. The running time is 7:10 and the file is 90 megabytes.

I'm currently working on creating another version of this to show the Video Transitions which should be completed and ready for viewing this weekend. Check back here for updates.

Cheers and Happy Effecting!

Something Big Is Coming Soon...

It's all about effects and transitions. That's all I can say right now. But it's big. :) Stay tuned. I'm beat and going to bed.

Tip Of The Week

    Use ALT-[ and ALT-] with the CTI for controlling the location of the WORKBAR.
    Have a great tip or trick? Share it with everyone by sending your tips to Tip Of The Week

Editing Essentials

    The Timeline’s current-time indicator(CTI), a blue triangle in the time ruler, corresponds with the frame displayed in the Monitor panel’s Timeline view. A vertical line extends from this current-time indicator through all the tracks.

Inside Elements 2.0

EXAMPLE VIDEOS

Hall of fame

    Will your REP video be the first entry in our Hall of Fame?

Poll

    What kind of Premiere 2.0 How-To video would you most like to see?
    Using Photoshop Elements with Premiere Elements
    Organizing Project Workflows
    Creating Cool Stuff with the Traveling Matte Effect
    Using Sound Effectively
    Using Titles Effectively
    Just the Basics Please - Editing for the Beginner
    Other - Please Leave A Comment for your Suggestion
      
    Free polls from Pollhost.com

About me

  • I'm Greg Watts
  • From
My profile